
Short on time? Here’s how to set parental controls on iPhones and iPads:
- Enable Screen Time. Navigate to Screen Time in your and your child’s iPhone Settings and turn it on.
- Toggle restriction settings. Choose which parental controls you want to enable from the list of available settings and toggle the switch.
- Install a parental control app. Add extra protection with a good parental control app for iOS (Qustodio is the best!).
Apple’s built-in parental controls for iPhones are pretty good. For example, you can set screen time limits, restrict content, and filter apps and web searches. They’re pretty simple, but figuring out how to enable and set them up takes some time.
I created this guide to help you get through the steps as fast as possible, without having to do too much digging through your kid’s iPhone. I also made a list of some common ways that kids typically get around Apple’s built-in parental control app and how to prevent that from happening.
I came up with my own recommendations for a good parental control app, too, since Apple’s is pretty basic — you don’t get any of the convenient extras that are standard with third-party parental control apps. These parental control apps also give you more granular control. My favorite is Qustodio.
Are Apple’s Built-In Parental Controls Good Enough for iPhones in 2025?
Not if you want more control over your child’s iPhone device. Apple’s built-in parental controls are decent, but they’re pretty basic. They let you set time limits for specific apps, schedule device downtime, restrict access to explicit content, and manage privacy settings, but you can’t do app filtering on browsers besides Siri, they lack a location-tracking feature and call monitoring.
That’s why I prefer parental control apps like Qustodio that come with advanced content filtering on more or all browsers, social media monitoring, location tracking, and web browsing supervision.
Quick summary of the best parental controls for iPhones:
- 🥇 1. Qustodio — Best parental control app for iPhones (powerful web & app filtering).
- 🥈 2. Norton Family — Great app for families with lots of iOS devices to monitor.
- 🥉 3. Bark — Good for older children (excellent social media monitoring).
How to Set Parental Controls on iPhone (and iPad)
The built-in parental controls on iOS are pretty straightforward to set up and use. You can set and schedule screen time limits, set app limits and privacy rules, and decide who they can communicate with on their phone.
Here are detailed step-by-step guides that explain what each does and how to enable each parental control feature on an iOS device.
Preliminary Step: Set Up Apple Family Sharing
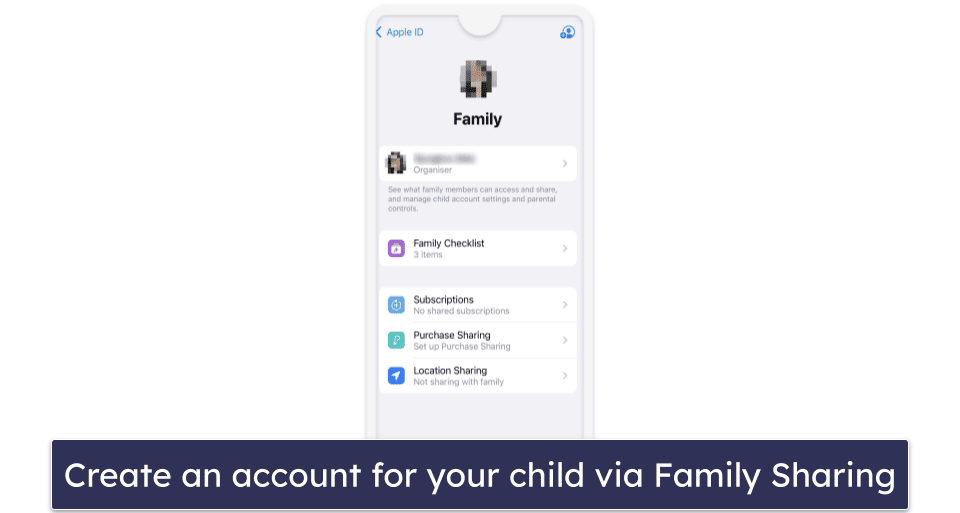
To use the built-in parental control, you need a Family Sharing group, to which you can add up to 6 children. Family Sharing also allows you to share access to Apple services with your family members, like an Apple Music subscription, other purchases, and your location.
- Navigate to Settings on your iPhone or iPad.
- Tap on the Family option.
- Then, tap Family Sharing and follow the on-screen instructions to set up the group.
- To add your kid to the group, go to Family Sharing again and select Create an Account for a Child. If they don’t have an Apple ID already, create one for them while adding them to your Family Sharing group.
Step 1. Enable Screen Time
Screen Time allows you to limit your child’s screen time on their iOS device. More specifically, it lets you decide when your child won’t be able to use their device by entering start and end times to make sure they’re focusing on their homework or aren’t using their phone when it’s bedtime.
- Navigate to Settings.
- Scroll down and tap on Screen Time. Follow the on-screen instructions to enable it.
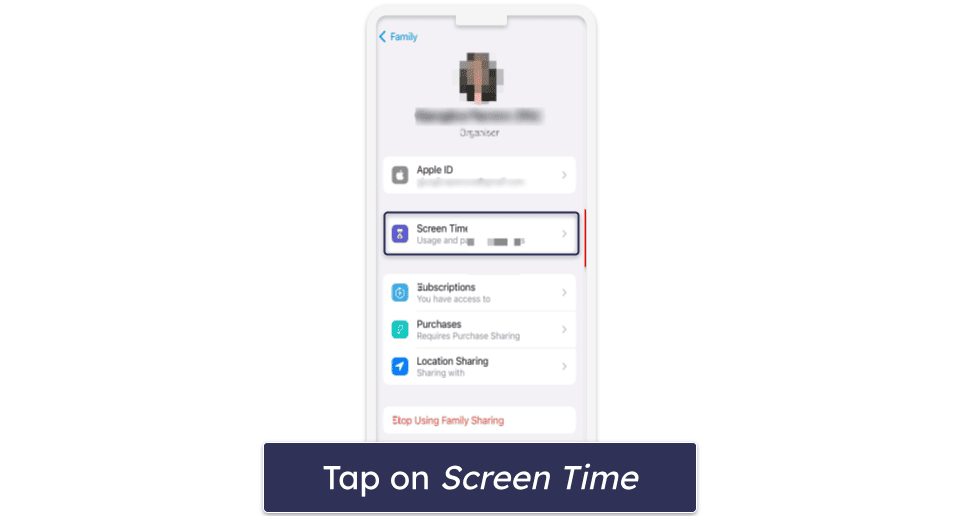
This is also where you can approve your child’s request for more time if and when they ask for it.
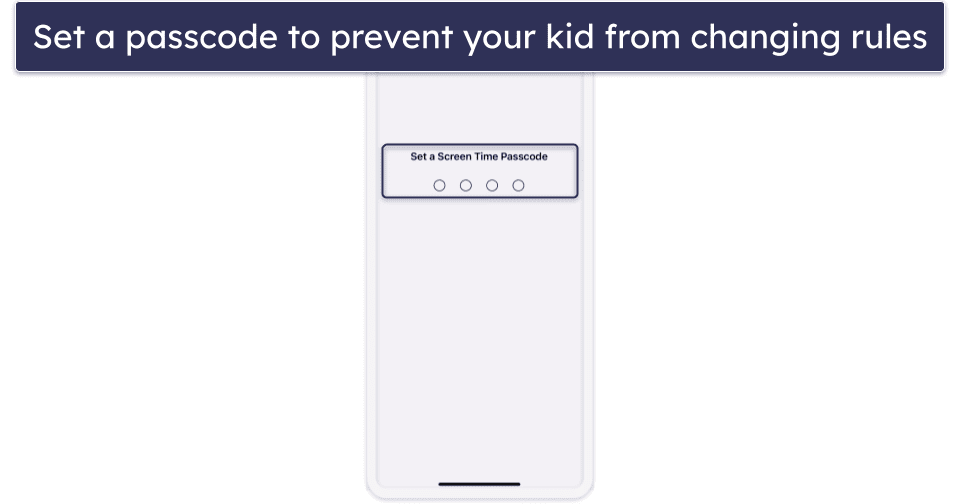
- Set up a Screen Time passcode to save the changes. The Screen Time passcode is a passcode that secures the Screen Time settings on an iOS device and makes sure your kid can’t change your screen time rules.
Step 2. Schedule Screen Time Breaks With Downtime
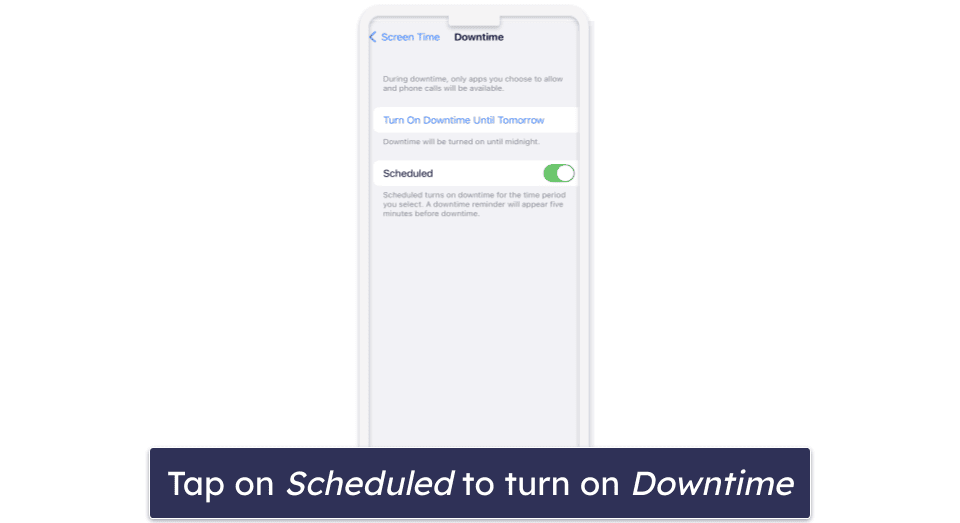
Downtime lets you schedule periods during which some features are restricted. It’s designed to help children take a break from their devices and reduce screen time during specific hours, such as bedtime, study time, or family gatherings.
- From Screen Time, tap on Downtime.
- Enter your Screen Time Passcode.
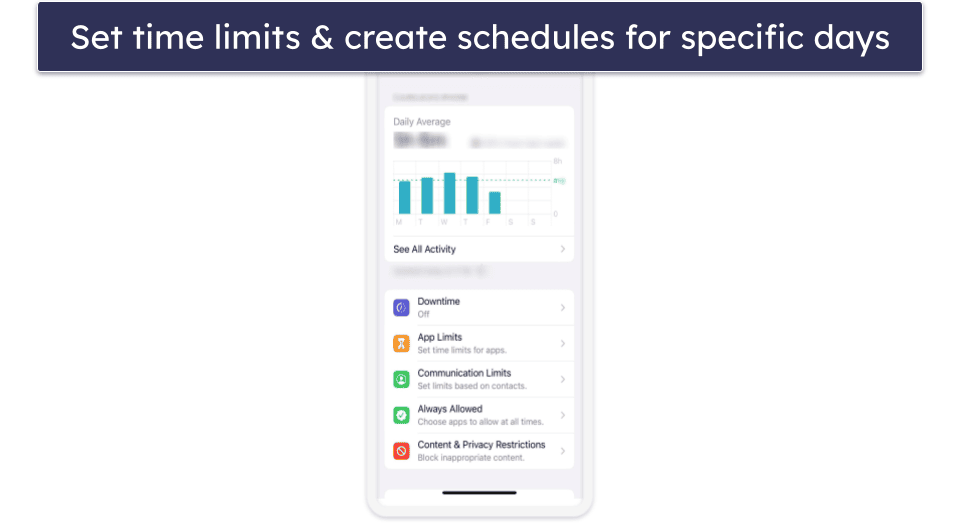
- Tap the Scheduled toggle. This will enable the Downtime feature.
- Select Every Day and select the start and end times to schedule the same time limits for every day.
- Select Customize Days and set specific times for each day if you want to set different time limits for certain days, like on the weekends.
Step 3. Set App Limits
App limits let you set daily time allowances for specific apps or app categories. When the allotted time for a particular app or app category is up, your kid won’t be able to access it until the next day.
- From Screen Time, tap App Limits.
- Tap Add Limit.
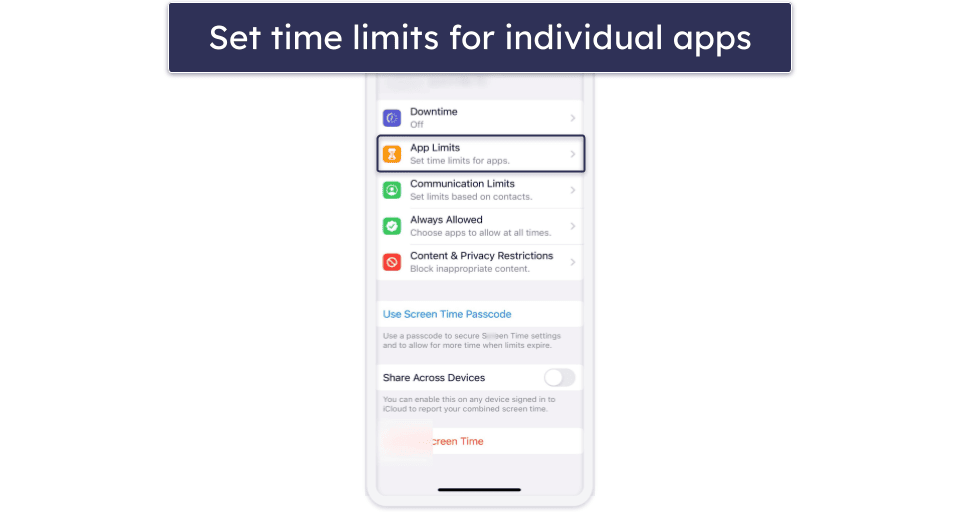
- Select the categories you want to restrict.
- To restrict individual apps, tap the category name, which will allow you to see all the apps in that category. From there, select the apps you want to limit.
- You can also tap on All Apps & Categories to limit access to all apps and categories on the device.
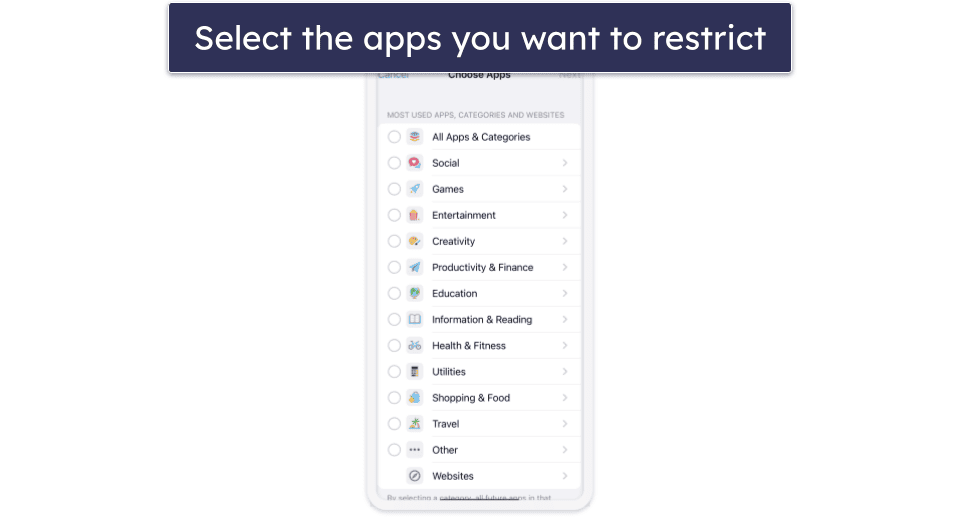
- Tap Next and set the amount of time allowed. Tap Customize Days to set an amount of time for each day. Then set limits for specific days.
- Tap Add to save the changes.
Step 4. Set Communication Limits
Communication Limits allow you to control who your child communicates with on their iOS device. It lets you block incoming and outgoing phone and FaceTime calls, as well as messages from specific contacts, and decide whether you want to enforce these rules during certain periods of the day or at all times.
- Enable Contacts in iCloud. Go to Settings > [child’s name] > iCloud, and turn on Contacts. Note that you won’t be able to manage your kid’s communication if they’re not using Contacts in iCloud.
- Visit Settings > Screen Time.
- Click on Communication Limits.
- To restrict communication, choose During Screen Time and pick either Contacts Only, Contacts & Groups with at Least One Contact, or Everyone.
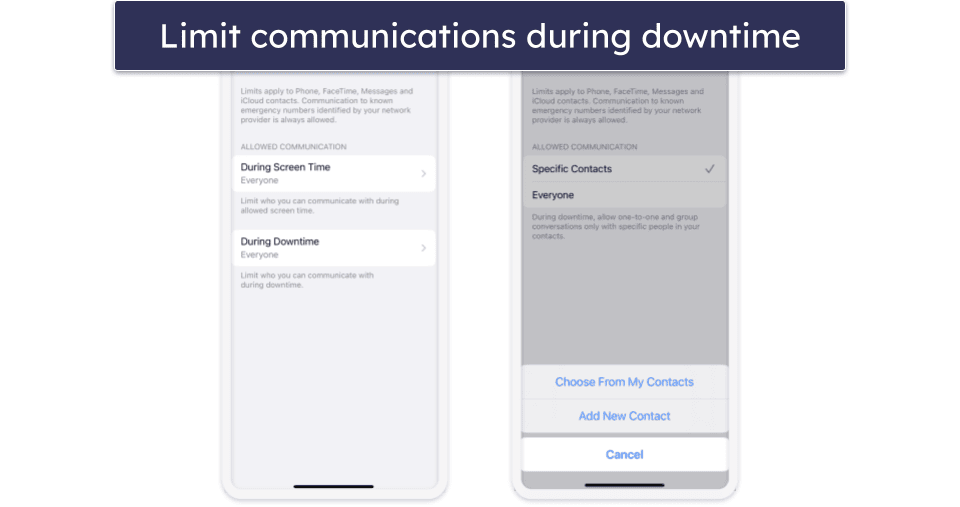
- To limit interaction during downtime, select During Downtime. The choice you made for During Screen Time will automatically be applied here. You can also adjust this to Specific Contacts if you want to. In the case of choosing Specific Contacts, tap on either Choose From My Contacts or Add New Contact to determine who can communicate during downtime.
- To manage your child’s contacts, select Manage [child’s name] Contacts. This allows you to see, modify, or remove your child’s contacts.
Step 5. Set Content & Privacy Restrictions
Content & Privacy Restrictions gives you the ability to control access to content, apps, and other functionalities on your child’s device, like setting limitations on explicit content, purchases, downloads, and privacy settings on your kid’s iOS device.
- Navigate to Settings > Screen Time.
- Choose Content & Privacy Restrictions and enable Content & Privacy Restrictions. For added security, add a passcode that must be entered prior to altering any settings.
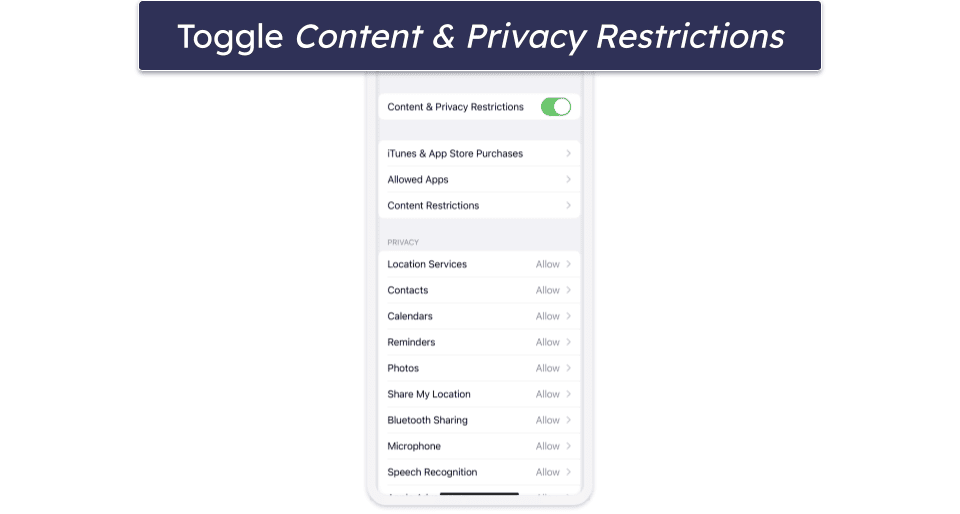
- Set content allowances for purchases from the iTunes Store and App Store. You can further customize these rules by content ratings.
- To restrict certain apps or features, tap on Allowed Apps and select the apps and features you want to allow. When you turn off an app or feature, the app or feature will be removed from your Home Screen, but it won’t be deleted.
- To prevent the playback of music with explicit content and movies or TV shows with specific ratings, from Content Restrictions, select the settings that you want for each feature or setting under Allowed Store Content. You can restrict content, such as music, podcasts, fitness, news, music videos, music profiles, movies, TV shows, books, apps, and app clips.
- To restrict web content in the Safari browser, tap on Web Content and then choose Unrestricted Access, Limit Adult Websites, or Allowed Websites. There’s an option to also add specific websites to an approved or blocked list or limit access to only approved websites.
- To set rules for Siri, tap on Content Restrictions, scroll down to Siri, and select your settings. This feature lets you prevent Siri from showing explicit content and searching the web when your kid asks a question.
- To restrict the Game Center, tap on Content Restrictions. Select Game Center, then choose which content to restrict. Your options include Multiplayer Games, Adding Friends, Connect with Friends, Screen Recording, Nearby Multiplayer, Private Messaging, Profile Privacy Changes, and Avatar & Nickname Changes.
- To make changes to privacy settings, tap on Privacy, and select the setting you want to change. From there, you’ll also be able to make changes to privacy settings and manage access, like blocking apps from accessing location services, apps like calendar, contacts, reminders, photos, and more.
- To allow changes to other features and settings, tap on Allow Changes. Next, choose the features or settings that you want to allow changes to and select Allow or Don’t Allow. You can allow or prevent changes to settings and features like, Passcode Changes, Account Changes, Cellular Data Changes, Reduce Loud Sounds, Driving Focus, TV Provider, and Background App Activities.
Step 6. Install a Third-Party Parental Control App for iOS
- Get a good parental control app for iOS. I recommend Qustodio, as it has excellent web and app filtering, lets you monitor your child’s calls and messages, and has a location-tracking feature.
- Download the app on your device. Visit Qustodio’s website or find the app on your device’s app store. Follow the on-screen instructions to set it up. The whole process shouldn’t take longer than 2 minutes.
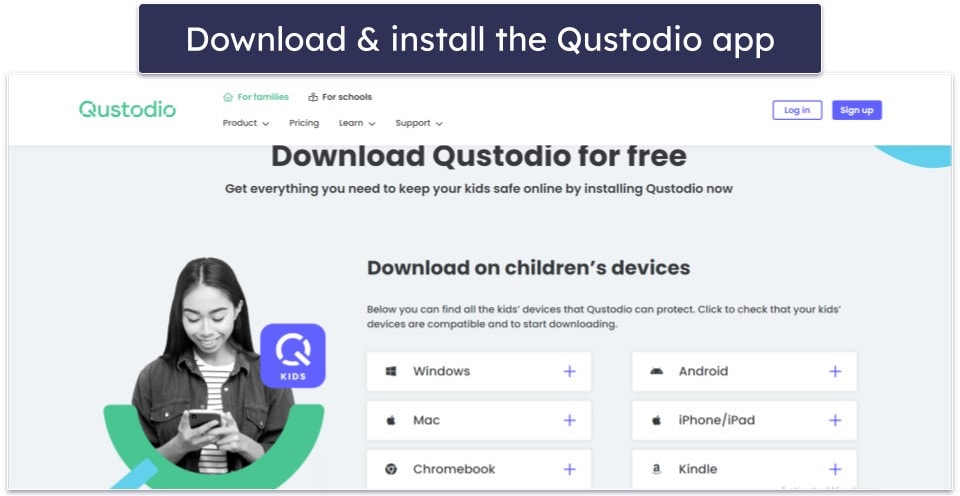
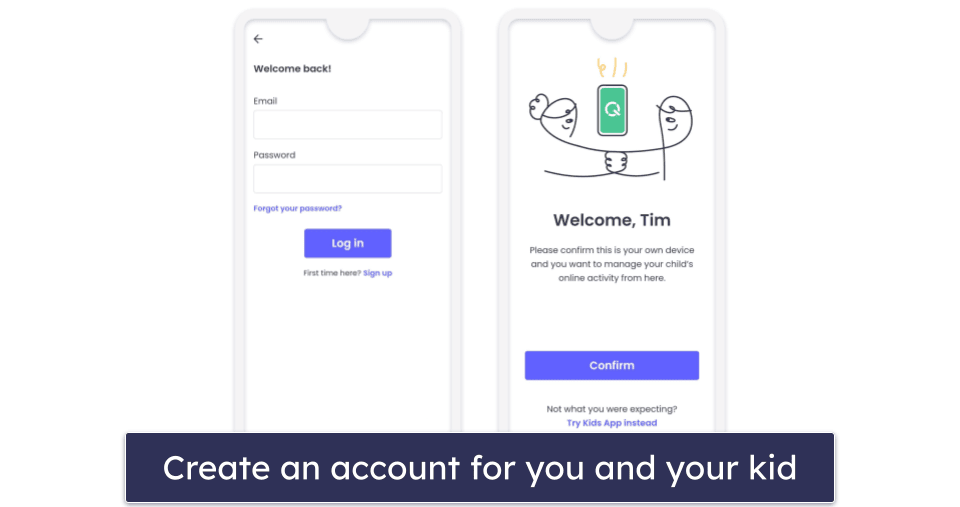
- Create an account and add a profile for your child.
- Set up the app on your kid’s device. Download the app from the App Store on your kid’s phone. Then, follow the on-screen instructions to set it up. This involves accepting the necessary permission, so you can track your kid’s iOS device.
- Set rules from the parent app. That’s it! Your kid will now only be able to use their phone and access content and apps if you’ve allowed them.
Can Kids Get Past Parental Controls on iPhone?
Yes, tech-savvy children are able to bypass Apple’s built-in parental controls. Here are some ways they get around the restrictions:
- Reset time limits by deleting and reinstalling. If your kid deletes the app, it’ll disappear from Screen Time’s radar. And if they just reinstall it, Screen Time won’t reapply the same rules. Qustodio, Norton Family, and Bark prevent this by maintaining app-specific time limits, even after reinstalling the app.
- Bypass YouTube restrictions via iMessage. Some apps, like iMessage, play YouTube videos within the app. This means that if someone sends your kid a YouTube video, the restrictions you set to the YouTube app won’t apply. If you don’t want your kid visiting YouTube, you can block the app with any of the parental control apps I recommend.
- Screen record your passcodes. Your kid may be able to install a screen recording app on the phone to capture your Screen Time passcode that they need to get rid of your restrictions. Top parental apps like Qustodio don’t rely on device-level passcodes for restrictions, making this attempt ineffective.
- Factory reset. Performing a factory reset erases all Screen Time settings. The parental control apps I recommend apply settings to the user account, not the device. So, a factory reset won’t remove any restrictions.
- Time zone and device time changes. To get around screen time limits, kids might change the device’s data or time zone. Luckily, parental apps like Qustodio use their servers’ time, not the device’s time.
Frequently Asked Questions
What’s the best control app for iPhone?
Qustodio is my favorite parental control app for iPhone. It comes with great web and app filtering, screen time management, location tracking, YouTube monitoring features, and in-depth activity reports.
Are there free parental control apps for iPhones?
Yes, but I’m not a huge fan of free parental control apps because they don’t have the features to monitor your child’s activity on their iPhone device efficiently, and have limited device support.
There are good free parental control apps, but I prefer paid parental control apps, like Qustodio. It comes with all the industry-standard features for monitoring your kid’s iPhone, like web and app filtering, screen time management, a location tracking feature, and cross-platform support.
What can I control with iPhone parental controls?
iPhone’s parental controls come with plenty of decent features, like app limits, downtime scheduling, and content and privacy restrictions. They allow you to control how much time your kid spends on a certain app, schedule downtime, restrict access to explicit content, and manage privacy settings.
If you want more control, I recommend a parental app like Qustodio. It allows you to filter more app and web content, and social media monitoring, provides you with activity reports, and has a location tracking feature.
Can I track my child’s location using parental controls on an iPhone?
Apple’s built-in parental controls don’t provide location-tracking features. However, you can use other services, like any of the parental control apps on this list, as they all offer location-tracking functionality.
Can I Manage My Child’s iPhone From an Android Device?
Yes, but you’ll need to find a good third-party parental control app that supports cross-platform monitoring. Apple’s native parental control features only allow cross-monitoring between Apple devices.
A great parental control app that supports cross-platform monitoring is Qustodio. After installing Qustodio on your child’s iPhone, you can monitor their activity through the Qustodio app on your Android device or through their web portal. This app allows you to set screen time limits, filter inappropriate content, block certain apps, and even track their location.