
Updated on: January 6, 2025
Short on time? Here’s how to remove the redirect virus:
- Remove extensions, then change your homepage and search engine. Uninstall any recently installed browser extensions and change your web browser’s homepage and default search engine to the ones you want to use.
- Scan device. Run a full system scan with a high-quality antivirus (I like Norton best).
- Remove virus/es. After the scan is complete, let the antivirus remove all instances of the redirect virus.
- Stay protected. Protect yourself from further infections with a high-quality internet security package (again, Norton is my favorite).
A redirect virus (often called a browser hijacker) is a malicious piece of software that forcibly redirects your web searches or requests to unrelated and often harmful websites without your approval.
Redirect viruses can cause significant disruption by interfering with your online activities and stealing your data — often to drive advertising revenue for the cybercriminal. These threats may also compromise your online security by exposing you to more severe malware and phishing sites.
The good news is that removing a redirect virus is pretty straightforward with the right tools and guidance. This guide provides a 3-step method to help you eliminate a redirect virus quickly and effectively. I’ll walk you through each step in detail, ensuring you regain control over your web browsing experience.
To successfully combat online threats, I recommend using a top-tier antivirus. Norton is my top choice for 2025 — it offers strong, comprehensive protection against all kinds of threats. You can try it out risk-free with a 60-day money-back guarantee.
Try Norton (60 Days Risk-Free)
Preliminary Step: Uninstall Extensions, Then Change Your Homepage and Search Engine
First, check your web browser’s settings and ensure there are no malicious extensions installed. Once you’ve done this, you need to check your homepage and search engine settings, as redirect viruses can often change these.
Click on your web browser for more detailed instructions:
For those just needing to run a system scan with a malware scanner, jump to Step 1.
For Chrome
- First, click the 3 vertical dots in the top-right corner of Chrome.

- Next, click Extensions, then Manage extensions.

- Look for any suspicious extensions and remove them. Simply click the large button that says Remove in the Extensions menu. Turning them off using the toggle switch won’t suffice.

- To change your homepage, click the Chrome menu icon again and go to Settings. In the left-hand menu, click “Search engine” and then set the search engine you want.
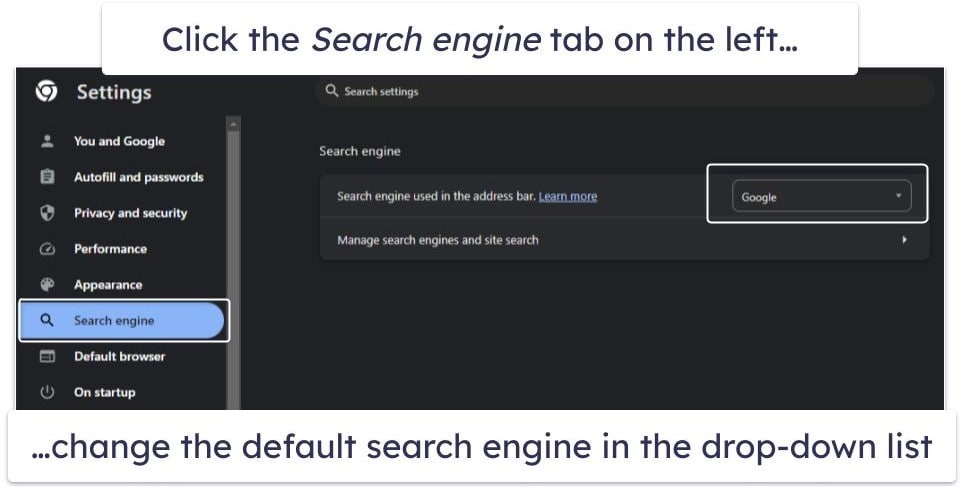
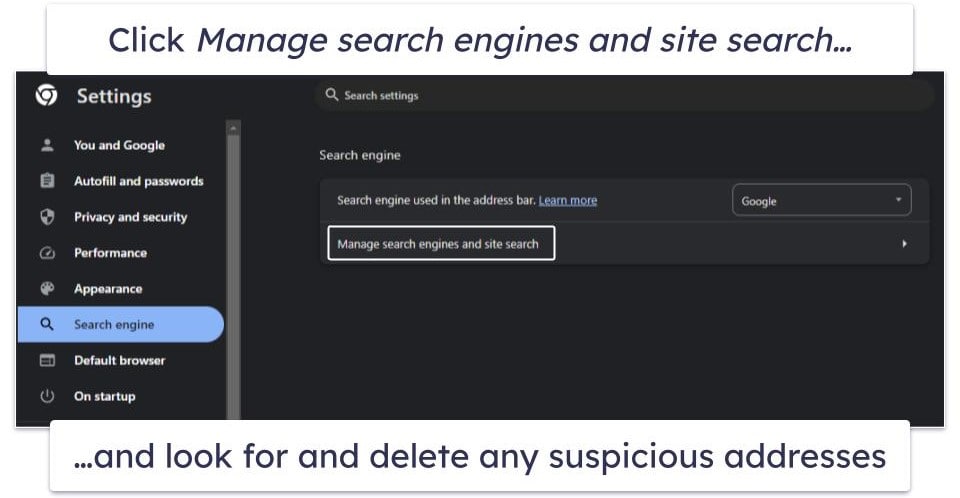
- Next, you should go to “On startup” in the left-hand menu and select the “Open the New Tab Page” option.
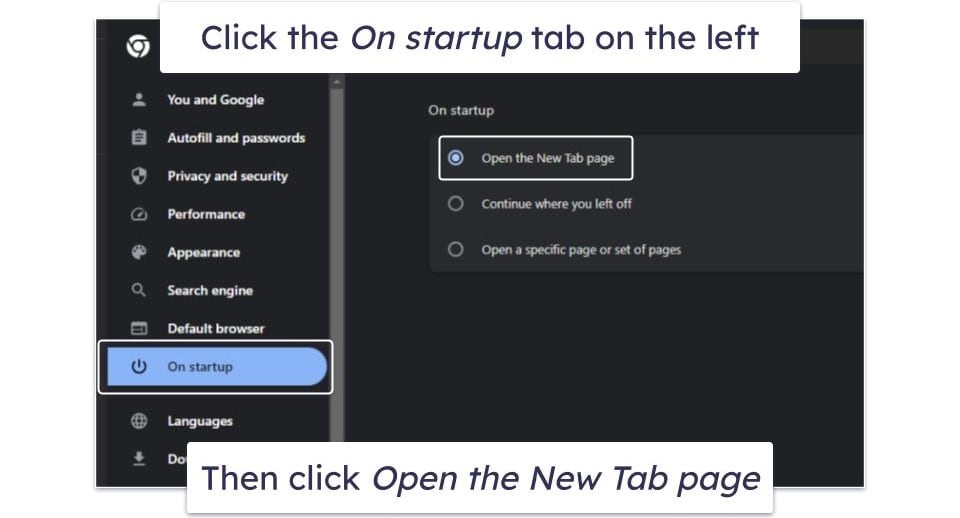
- Once you’ve done this, you can jump to step 1 and run a full system scan.
For Firefox
- To remove extensions in Firefox, start by clicking the puzzle-piece icon in the top-right corner of the browser.

- In the left-hand sidebar, choose Extensions.

- Click the 3 dots next to any suspicious extensions and click Remove. Simply toggling the switch to disable the extension isn’t enough.

- To change your homepage, open the menu using the 3 horizontal lines and click Settings. Proceed to Home and then Homepage and new windows.
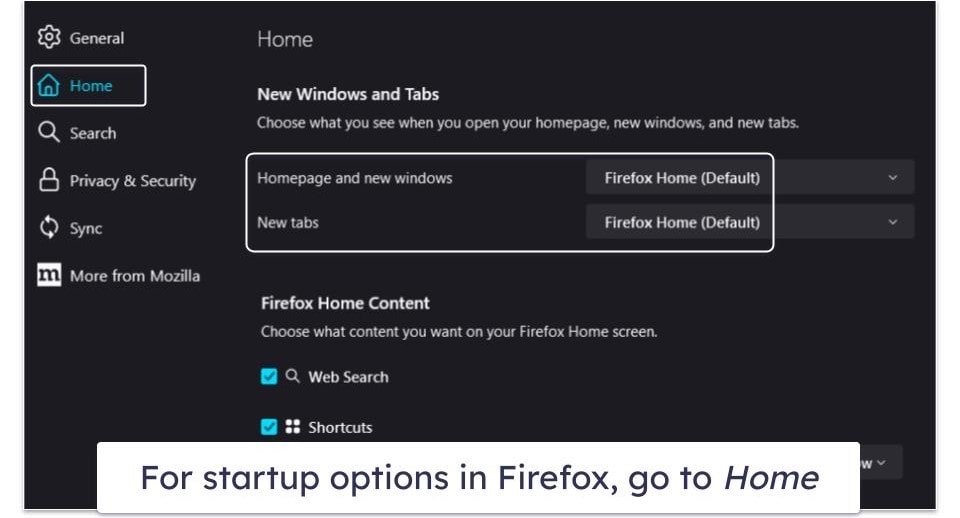
- To change your default search engine in Firefox, open the Settings menu by following the above steps. Then click on Search in the left-hand menu. In the “Default Search Engine” section, select the search engine of your choice from the drop-down menu.
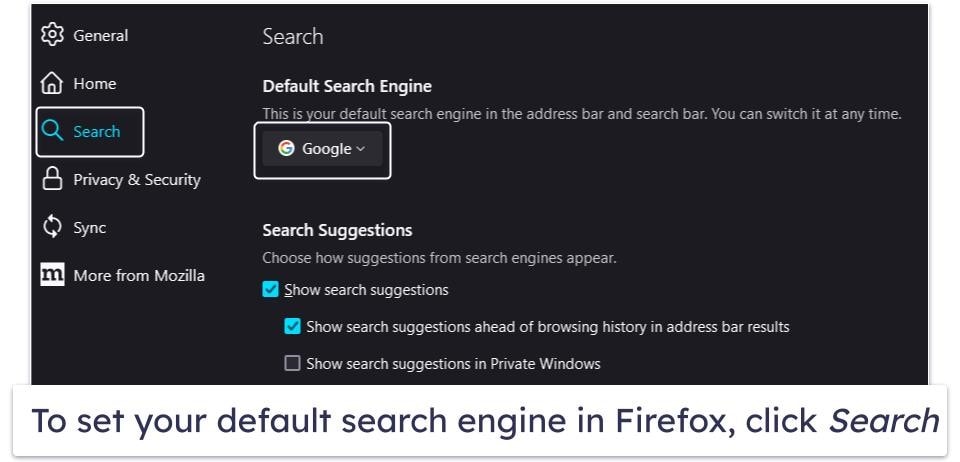
- You can now skip to step 1.
For Safari
- Open your Safari browser and click Safari in the top menu of your screen. Next, click Settings.

- Next, navigate to Extensions. Look for any unwanted extensions and uninstall them.

- To change your homepage in Safari, navigate to the General tab on the same Settings page. Ensure your homepage is set to a preferred URL and not a browser hijacker.

- Next, go to the Search tab and select your preferred search engine.
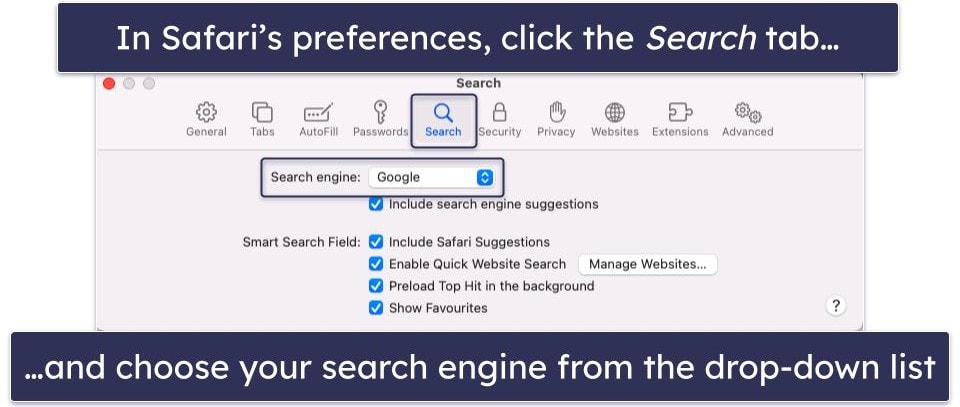
- Now you’ve reset your web browser, you can jump ahead to step 1.
For Microsoft Edge
- To uninstall extensions In Microsoft Edge, click the puzzle-piece icon and select Manage extensions from the dropdown menu.

- Navigate to the add-on you want to delete, click the 3 dots, and select Remove from Microsoft Edge.

- To change your homepage, go to the menu, select Settings, then click on Start, home, and new tabs in the left-hand menu. In the “When Microsoft Edge starts” section, look for the name of any unwanted website and delete it.
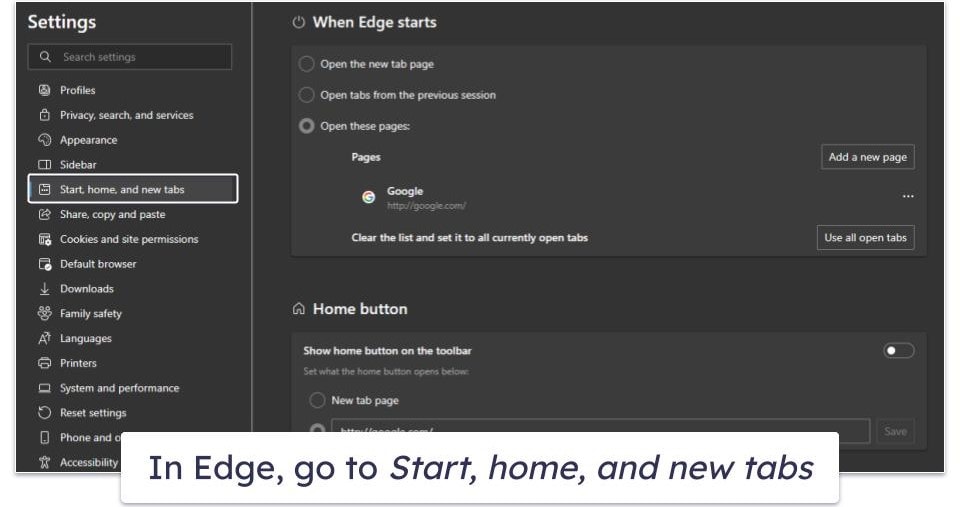
- To change your default search engine in Edge, go to Settings and select Privacy, Search, and Services. Scroll down to “Address bar and search” and click on it.
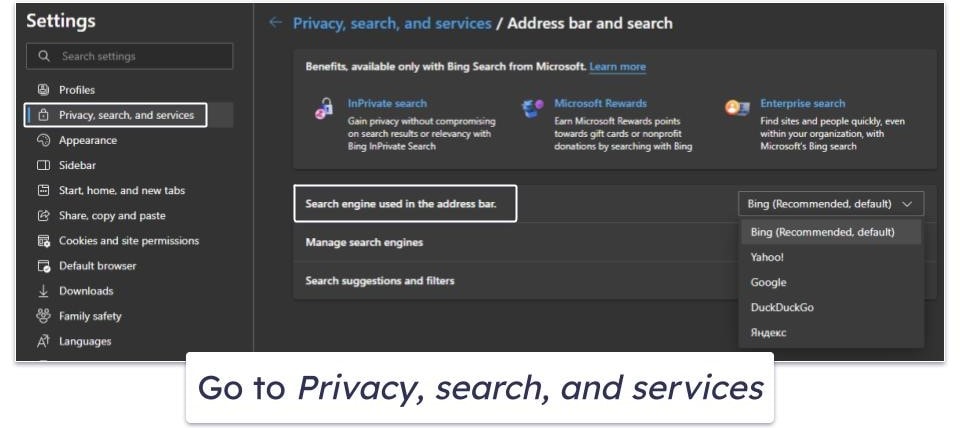
- Click Manage search engines and look for any suspicious search engines. Delete them by clicking the 3 dots to the right of them, and clicking Remove.
Note: You can’t remove the default search engines.
- You’re now ready to run a system scan to see if you have any malware on your computer.
Step 1. Identify the Redirect Virus With Your Antivirus (And Don’t Make the Problem Worse!)
IMPORTANT: Do not connect any mobile devices or USB sticks to a computer that may be infected with a redirect virus. This could lead to the virus replicating itself onto those devices.
First, ensure that you have a reliable antivirus program installed on your system. Once it’s installed, initiate a full disk scan. Even if you know where the infection originated from or the location of the malicious .exe file, it’s best to perform a full disk scan.
A full disk scan will detect, quarantine, and remove every trace of the redirect virus. Additionally, it helps ensure your device is free from other types of malware, such as rootkits, spyware, and worms.

It’s important to let the scan run to completion. DO NOT stop the process once the virus appears in the list of infected files. It’s impossible to know the extent of the infection and the number of copies of the virus within your system until the scan is complete.
Bear in mind that a full scan might take between 1 and 4 hours, depending on the number of files and processes on your computer. So, exercise some patience while your antivirus thoroughly scans every single file. Once it’s done, the antivirus will notify you, and all detected malware, including any redirect viruses, will be successfully identified and quarantined.
You can now proceed to Step 2.
Step 2. Remove the Redirect Virus Infection and Delete Any Other Infected Files
Your antivirus will give you the option to delete all of your infected files once it has identified and quarantined them. Advanced users may want to review the quarantined files to make sure there aren’t any false positives before confirming the deletion. However, it’s fine to trust your antivirus and delete everything — Norton and other top-notch antiviruses hardly ever produce false positives.

Now you need to restart your computer and run a second full disk scan. This ensures all traces of redirect viruses and other malware have been completely removed. The second scan shouldn’t take as long as the first, as most antiviruses (Norton included) will remember the files they’ve scanned before and run subsequent disk scans much faster.
Again, let your antivirus complete its second scan. If no malware is found, that means your device is now 100% free from malware. If the scan does find malware, delete the malware files and repeat the process until the scan comes out clean.
Congratulations on successfully removing the redirect virus. But beware — there will always be new threats out there. That’s why it’s so important to have an antivirus and to always exercise caution.
Step 3. Keep Your Device From Getting Re-Infected
It should be clear that maintaining a vigilant defense against online threats is crucial to protecting your privacy and preserving your system’s performance after dealing with the frustration of the redirect virus. Implementing sound cybersecurity practices can drastically reduce the risk of encountering viruses, malware, and other threats. Here are some best practices for 2025 to keep malware at bay.
- Keep Your Software, OS, and Drivers Up-To-Date: Updating your software, operating system, and drivers regularly is important for maintaining a secure digital experience. New software typically comes with vulnerabilities that are actively exploited by hackers. Developers respond with updates that patch these vulnerabilities, which is why enabling automatic updates and routinely checking for newer versions of your software, OS, and drivers is crucial. This will help minimize risks and keep your device in good working order.
- Don’t Download Suspicious Files: Exercise great caution when downloading files from the web. Cybercriminals often hide malicious software in files that appear safe. Avoid clicking on suspicious links or downloading attachments from unfamiliar sources as they might contain malware. Always confirm the authenticity of a website or source before initiating any downloads. You can do this by using a reputable antivirus program like Norton, which flags malicious files before you download them and indicates unsafe websites as you search for them. Staying alert will greatly reduce the likelihood of introducing malware to your device.
- Secure Your Wireless Network and IoT Devices: Safeguarding your wireless network and Internet of Things (IoT) devices is crucial for the protection of your personal data. Use a password manager like 1Password to set up an unhackable password for your Wi-Fi network, and once you’ve done that, look for a lock symbol next to your network name to confirm it’s secured. Likewise, for all of your IoT devices, check the manual (or look online) for instructions on how to set up passwords. Use a password manager when generating passwords for these devices. Whenever you connect to a public network (e.g., in a cafe), it’s advisable to use a VPN like ExpressVPN to shield your data from trackers.
- Download a Secure Antivirus Program: A powerful antivirus solution will help prevent all sorts of malware threats, including phishing attacks, spyware, worms, and ransomware. It will also allow you to perform comprehensive system scans and provide features like real-time protection and a firewall. I highly recommend Norton — it has an excellent anti-malware engine, strong anti-phishing protection, and an intuitive user interface.
3 Best Antivirus Programs for Removing the Redirect Virus
Quick summary of the best antiviruses for removing the Redirect virus:
- 🥇 1. Norton — Best antivirus for removing redirect viruses in 2025 (100% detection).
- 🥈 2. Bitdefender — Lightweight antivirus with a great scanner and tons of features.
- 🥉 3. Intego — Best antivirus for removing redirect viruses from Macs.
Editors' Note: Intego and this site are in the same ownership group.
Frequently Asked Questions
How to remove a redirect virus from Android?
To remove a redirect virus from Android, start by going to “Settings,” then “Apps,” and identify any suspicious application. Uninstall any unfamiliar or suspicious apps. If the problem persists, consider using a reliable antivirus app to scan and remove any viruses. Norton offers advanced malware detection and real-time protection tailored for Android devices.
How do I get rid of a redirect virus on Chrome?
To get rid of a redirect virus on Chrome, start by checking your browser extensions and removing any suspicious ones. Then ensure your search engine and homepage are set to your preferred settings. For further protection, consider using an antivirus like Norton or Bitdefender. They provide strong malware protection as well as excellent web protection, including anti-phishing measures and malicious website blocking.
What is a redirect virus?
A redirect virus is a piece of malware that redirects your web searches to different websites, typically filled with ads or other malicious content, without your consent. It infiltrates your system via freeware, spam emails, or infected websites. It’s crucial to have effective antivirus software to eliminate such threats and prevent getting them in the future.
How to remove a redirect virus on Mac?
To remove a redirect virus on Mac, start by removing any suspicious extensions. If the issue continues, consider using an antivirus such as Intego, which is specifically designed to tackle Mac-related threats with features like real-time malware protection and an advanced firewall.